


远程遥控模式
一、远程模式的原理
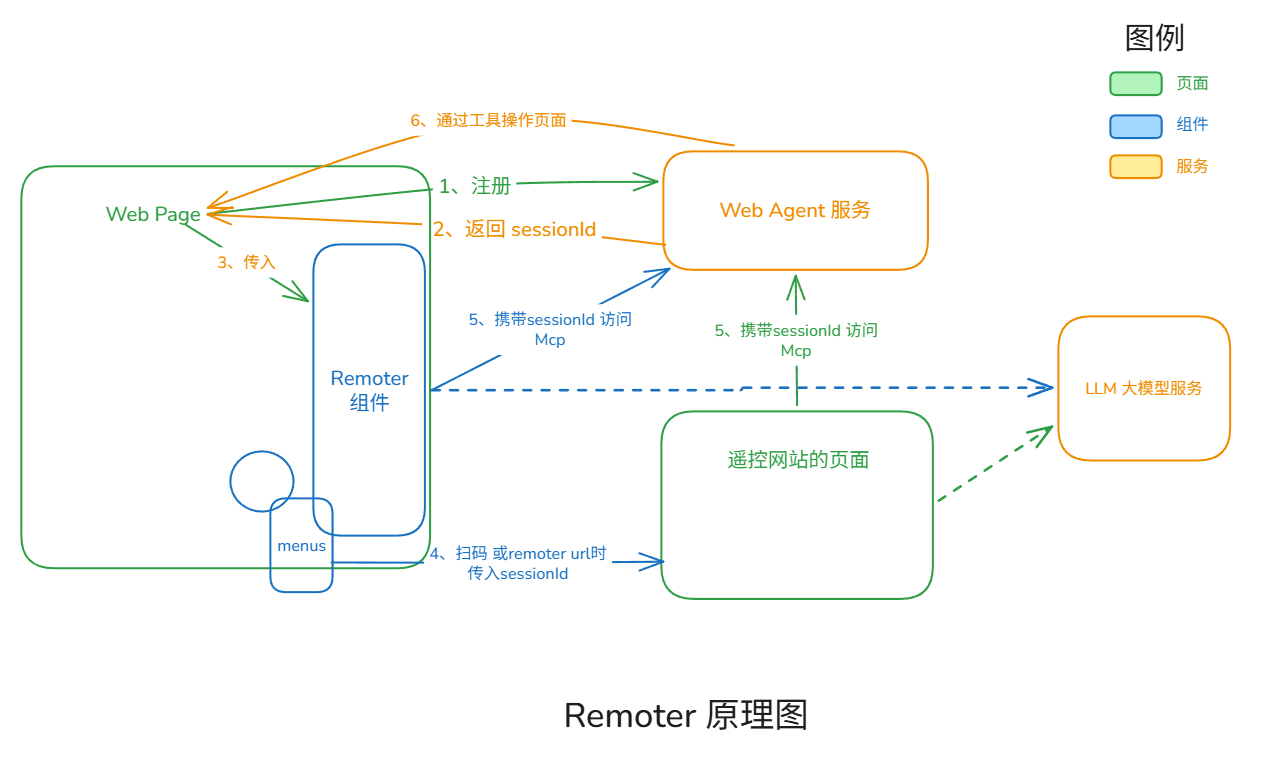
从上图可以看到,整个架构包含 5 个角色:
- Web Page 应用:用户正在开发的业务页面,需注册网页工具并向
Web Agent服务注册,完成网页智能化改造 - Remoter 组件:在系统中嵌入聊天界面(即
TinyRemoter组件本身)。接收当前页面的sessionId后,可创建 MCP Client 控制当前页面 - Web Agent 服务:本地部署的 Node.js 后端应用,作为智能代理中枢和 MCP 代理转发服务。接收
sessionId后与目标页面建立连接,并创建标准的 HTTP Streamable MCP Server,任意 MCP Client 均可连接并调用其工具,调用会转发至目标页面 - 遥控网站:部署的 Vue 项目,通过 URL 参数接收
sessionId,从而创建 MCP Client 控制目标页面 - LLM 大模型:为
Remoter组件或遥控网站提供 AI 对话能力
在这 5 个角色中,Web Page 应用 和 Web Agent 服务 是必不可少的最小系统,可组成标准 MCP Server 服务。业务网站完成智能化改造后,即可被任意智能体访问,例如 VS Code、CodeX、OpenCode 等。
Remoter 组件 和 遥控网站 均为可选角色:
- Remoter 组件:在当前 Web 应用中直接创建聊天窗口,实现 AI 对话闭环
- 遥控网站:面向异地办公等场景,例如从家里通过遥控网站,用 AI 对话操作公司电脑上的浏览器
TinyRemoter 是整个架构的枢纽组件,Remoter 组件和遥控网站中的对话框均使用该组件。它一边接收页面的 sessionId,一边与 Web Agent 服务和 LLM 大模型建立连接,打通整个 AI 对话流程。
TIP
普通场景下,网站应用可能不需要远程遥控功能,只需在页面中使用原生 WebMCP 编写工具,直接供页面上的 Remoter 组件对话即可。此时无需引入 Web Agent 服务,参考 快速开始 实现纯前端方案。
遥控模式的典型应用场景:
- 跨浏览器的 AI 操作网页
- 使用其他智能体操作网页,例如 VS Code、CodeX、OpenCode 等
- 类似 Chrome DevTools MCP、Browser Use 等工具的用途,支持 AI 操作网页、自动化测试等
二、私有化部署 Web Agent 服务
部署方法详见 Web Agent 文档 或 Web Agent 仓库。
它本质是一个 Node.js 服务,本地启动后提供一组 API 接口(如 ping、list、mcp 等)。在 TinyRemoter 的 agentRoot 属性中配置 Web Agent 代理服务地址即可,例如:http://localhost:3000/api/v1/webmcp/。
<template>
  <TinyRemoter v-model:show="show" title="我的AI助手" agentRoot="http://localhost:3000/api/v1/webmcp/" />
</template>
三、私有化部署遥控网站
遥控网站需克隆官方仓库:https://github.com/opentiny/webmcp-sdk,然后进行本地部署。
网站源码位于 packages/next-remoter 目录。启动前需修改 src/App.vue 中的部分配置,例如 agentRoot、llmConfigs、systemPrompt 等属性,以及 vite.config.ts 中的 server、build 等配置。
cd packages/next-remoter

# 本地运行
pnpm dev

# 本地构建
pnpm build
启动后,遥控网站默认地址为 http://localhost:8087/。通过 URL 参数 http://localhost:8087/?sessionId=xxxxx 可连接受控网页。
四、完整示例
<template>
  <TinyRemoter
    v-model:show="show"
    title="我的AI助手"
    AILogoUrl="https://xxxx.com/icon.png"
    sessionId="your-session-id"
    agentRoot="http://localhost:3000/api/v1/webmcp/"
    remoteUrl="http://localhost:8087/"
    qrCodeUrl="http://localhost:8087/"
    :menuItems="menuItems"
  />
</template>

<script setup>
import { ref } from 'vue'
import { TinyRemoter } from '@opentiny/next-remoter'
import '@opentiny/next-remoter/dist/style.css'

const show = ref(false)
const menuItems = ref([
  {
    action: 'qr-code',
    show: true,
    text: '扫码连接',
    icon: `<svg>...</svg>` // 自定义图标
  },
  {
    action: 'ai-chat',
    show: true,
    text: 'AI助手'
  },
  {
    action: 'remote-control',
    show: true,
    text: '远程遥控',
    icon: `<svg>...</svg>`
  },
  {
    action: 'remote-url',
    show: true,
    text: '远程URL',
    showCopyIcon: true // 显示复制图标
  }
])
</script>